Hey all I have had some interest in the details of the class so I thought I would go ahead and get some information up. Since right now I have so much time on my hands.
I plan for this being a 10 week class I have 10 lessons lined up with assignments due 1 week from assigned day. Only people that request a grade will see one other than that you will get constructive criticism. I would like to take 2 field trips if there is enough interest in taking them. Proposed field trips are for the Portrait lesson and the Landscape lesson. For the Portrait lesson I can have models available or you can bring your own. For the Landscape we will be hitting the country in search of great landscapes.
The syllabus for the class is as follows:
Lesson 1: History and Definition
Lesson 2: Light Using it to Your Advantage
Lesson 3: Composure the Technical side of Great Photos
Lesson 4: Learning How to use Your Flash
Lesson 5: Portrait Photography
Lesson 6: Still Life-Telling a Story
Lesson 7: Close-ups
Lesson 8: Landscapes
Lesson 9: Sports
Lesson 10: Bringing it all together. When is a Hobby more than a Hobby.
This class is geared to those who shoot with point and shoot camera's or mid level camera's. This will not make you a professional but hopefully by the end you will be taking better photos, be happier with more of them, and deleting less.
9.24.2010

Sept 24 The days seem to get Crazier


So for the last 3 weeks I have been hobbling my way through life on a cam walker good enough it helps with the pain and I can still go to work. Well my Dr. not happy with the fact that after 3 weeks I am not getting better she sends me to a ortho foot specialist and bad goes to worse in 30 minutes flat. I now get to be laid up for 2 weeks trapped in country hell with only my dogs and the silence to comfort my pitiful butt. I have learned some valuable lessons with this experience that I feel compelled to share with everyone. 1. Crutches were invented by the devil himself. You simply cannot do anything while walking on them including walking. 2. To get around you must reduce yourself to implements that are otherwise reserved for those of age. (AKA The wheeley walker pictured.) 3. Sleeping in a cast is the most horrible thing you can experience due to the I will wake you every hour itching that happens in the middle of the night. 4. Showers are no longer something quick they are an expedition you must prep for in advance with all necessary supplies at hand cause no one is around when you need help. 5. When you take an otherwise active person and force them to be inactive it is NEVER a good thing.
So in light of my ailment I figured I would take the time to keep my blog up to date for 2 weeks sharing my new trials along the way. All I can say is at least my toe nails are pretty and match my cast. I will be researching new learning material and posting new tid bits on here as I find them I will also be handing out assignments and ways to post them to share with others I only wish teaching photog could have been what I chose to do to begin with as I love to help others take great photos. Each assignment will last 1-2 weeks depending of the difficulty of it. If you would like to be graded let me know otherwise I will only give constructive critisism not any grading. No one fails my class if you try that is worth it's weight in gold. Your assignment in the meantime is to set up either a flickr account (free) or a photobucket account (free) if you plan on participating in class assignments please send me the link to your account and any guest password that I would need to look at your assignment photos. Send your links and/or passwords to basicandbeyondphotography@gmail.com
Today's photo tip: Artistic Intent Borrowed from website Best Photo Lessons Online
Why do you want to take pictures? You may want to share with others how you see the world around you, you may want to document your life and that of the people you love, you may have a desire to create images that blow other people away. There are so many excellent reasons to get into photography and why you do so is up to you.
I've put this section first because when I learned photography - it was technique first and art second. That is a time honored way of learning photography. But now that I've done it for 30 years I think it was a backwards way of learning photography.
Photography is an art and you are the artist. If you're thinking you could never be an artist I have good news for you - you already are. Even just taking the time to read this page you've shown you have the desire make images that give you pleasure and can affect others - that is art.
Now comes the fun part - think about why you want to take pictures. Write down a list of:
1 - Things you like about photography. Do you love the moment of seeing the images in prints or on your screen? Is it the challenge of making the photo? Is it the sharing the images with your friends? Is it the memories you get when you look at your photos later? Whatever it is you like about taking pictures, write it down.
2 - What you want to achieve with photography. Do you want to remember what your kids are like at each stage of their growing up? Do you like flowers or architecture or mountains and want to document them? Do you want to show the human condition? Do you want to pursue a career in photography? Write down what you want your photography to do.
3 - What subjects you want to shoot. Flowers, dogs, kids, models, food, people's feet, whatever. Write down those things you find catch your eye or make you wish you had your camera when you see it.
4 - How you feel about those subjects. Do you love it, hate it, feel afraid of it, laugh at it, wish it was yours? This is actually the most important section of the lesson. When you understand what you feel towards something, you'll find your photography of it improves automatically.
Now grab your pen and start writing. Once you're done, put it on the wall, throw it into your camera bag or put it somewhere you can easily review it. Add or change it as you grow as a photographer. But once you have the list, you have a great tool to make your photography better.
You may have noticed the link in top right corner for the book "Drawing on the artist within" by Betty Edwards. I highly recommend this book for learning about bringing out your inner artist - it is a very, very good book which taught me a lot.
9.10.2010
Sept 10 2010 Reflections of crazy days in the life of a photographer.

So with the anniversary of one of the biggest tragedies to happen in the US coming tomorrow I thought I would reflect on blessings. Blessed that I have a family that loves me, that I have a roof over my head, that I have food in my cupboards, and that we have brave people willing to put their lives in danger to keep us safe at night. One of my favorite sayings from all the conflict is "If you cannot stand behind our armed forces feel free to stand in front of them" sacrifice is what they do and we should be honored that there are still those out there willing to do it for all of us. So in light of the anniversary tomorrow if you know someone in the military, police department, security of any type, fire department, or emergency services give them a big thank you and think of them when you lay your head on your pillow at night. As these represent those helping in New York the day the towers fell many of which lost their lives in the line of duty. Leaving behind children, spouses, and grieving loved ones. Just remember Freedom is Never Free someone pays for it even if it does not impact you it filters out to you.
9-11 We will Never Forget!!!!!!!!!!!!!!!!!
Today's photo tip:Since a lot of people I know have just had or are having babies this is for you.

9.01.2010
Sept 1 2010 Crazy Days in the Life of a Photographer
All images are property of Basic and Beyond Photography. Un-authorized reproduction of photos contained in this blog is punishable by law.
So I started a Photo 365 project about a month ago and let me tell you I suck at it. I get so involved with my life I forget to take a photo everyday or am just too busy to sneak it in. I can manage to everything else done but that one simple thing. What is even worse is I cannot manage to update my blog more frequently than once a month or once every other month. When will the insanity that is my life slow down? I have on the flip side been delving back into the world of art which seems to be very good for my sanity. Creating is something I have always had a knack of doing if only I could get paid to do that full time I would be in Heaven.
I want to share a little conversation my young one and I had a while back really I think under all that video game playing the cheeky little chap is quit bright if only life were a video game he would be the #1 high score. So he says to me "Mom why are you always taking pictures?" to which I reply "So I can remember things that we have done and help others remember too" after a few moments to ponder my reply he says, "Isn't that what we got brains for." Needless to say I was speechless I guess my roll of film is out on my photographic memory. Will have to remember to pick up another roll. You just gotta love a kids honesty.
Well I will move on to the part of my blog I have been told people look forward to the most. Today's photo tip.
Today's photo tip: See Better or as I call it Seeing through the Lens
See Better
Written by: Digital PhotographySeeing with Better Eyes
The psychology of seeing and how it affects compositionYour eye (and lens) sees something, but your eye is connected to your brain …. which interprets what you see….. it adjusts color
balance, ignores un-important things, tries to “edit out” those things you don’t want to see. You now must re-program your mind so that you really do see everything.

Here’s a simple case in point:
The Classic cars are in town and you see one you like and take a snapshot. You see the yellow car…. but not the meter on the left, the power lines above, or even the yellow on the bottom right…… your mind ignores those distractions for you.

Here’s what you must learn to do: Eliminate unwanted distractions …. either by cropping them out during printing (like I just did) or move in closer and crop them out with the camera and lens.

Or…… you could think about what you really want to show …. walk around, crouch down, look at it harder …. and then shoot.
The point is, you must concentrate and think harder about what it is you want to show… and force yourself to see how to eliminate those things you don’t want to show.
This should become habit…. you should practice doing this with everything that “catches your eye”. Your eye WILL begin to see better … and you will begin to think about the lighting, the angle, the “feel” of those things as you look around.
Sometimes you might feel weird or cursed because of the way you “stare at” – study – things, but it is essential that you develop this habit if you really want to get better. To become a true, serious amateur or top-notch professional you need to be constantly studying subject matter, light, composition, etc. AND figuring out how you want that shot to look in print.
One of the reasons I was considered a first-rate riot photographer was that, even in the middle of a riot – with all that noise and hate and physical violence and constant threats to myself – I forced myself to concentrate on:
HOW THIS PIC WOULD LOOK ON THE PAGE.

7.11.2010
Another Day in the Life? July 11

All photos represented in this blog are owned by blog owner and are covered by copyright laws. Any unauthorized reproduction is punishable by these copyright laws.
So it has been many months since my last blog entry. Mostly due to the big move and getting a routine with life and my work schedule and for this I am sorry. To both my readers and myself you grow when you share knowledge and personal growth got put on the back burner. So I have returned and I am not making any promises but will make a better effort of keeping the blog updated.
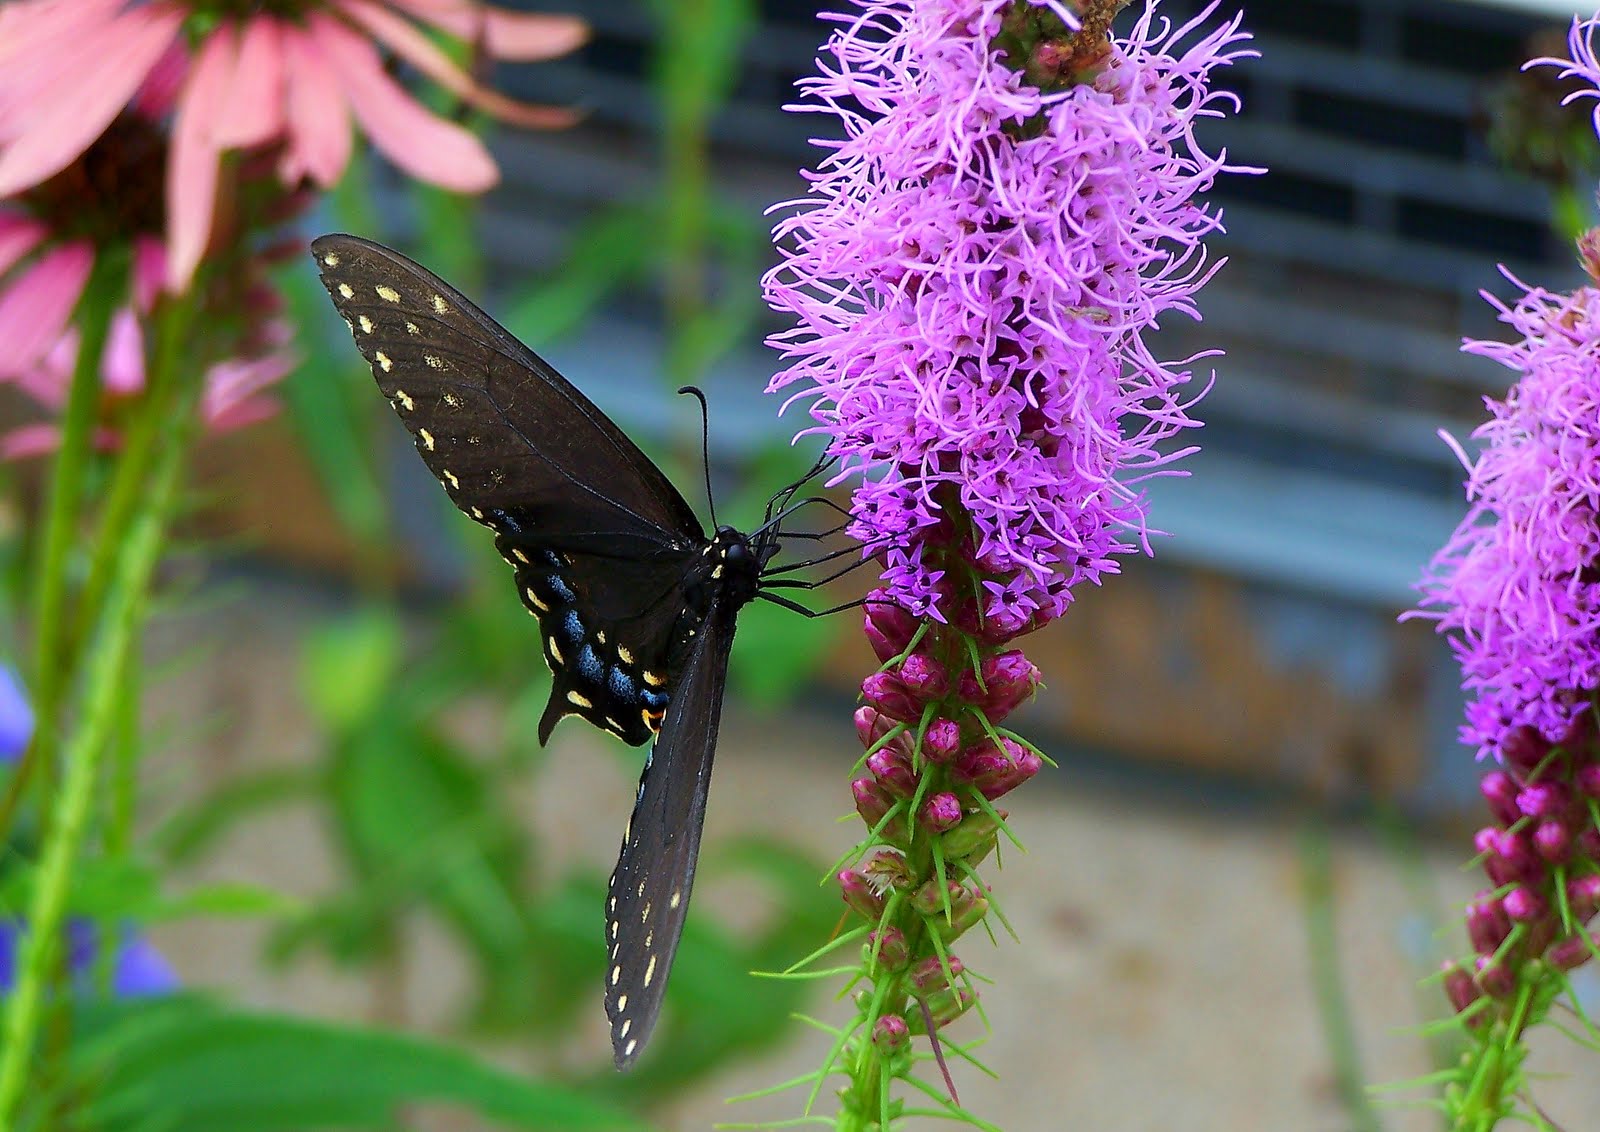
So we have successfully moved to the country and life is good the tranquility of country life is bliss. Yeah there is more work and there is a lot of it but the end result is so worth the sacrifice now. So in honor of our big move today's featured photo was taken at our new place and represents the beauty of country life. I am hoping that my next few installments can include more photos representing the beauty and tranquility of the new adventure in my families life. Cause believe me this has been an adventure.
I am on a mission after reading a few lesson's on my most favorite webs and have vowed to do a photo 365 but instead of lugging out my fancy DSLR I am gonna take a step back to my Kodak DX7590 which is a high end point and shoot and do my photo 365 with it. I get tons of comments about my photos some of which are made about photos taken prior to getting my DSLR and this will prove that the camera and all the bells and whistles albeit very nice to have are not necessary to achieve beautiful photos. I am also with the exception of watermarking purposes will not use photoshop on any of these photos they will be SOC.
Crossing my fingers it is not a photo 150 and I can actually take one photo a day for 365.
So let's get back to sharing knowledge and get on to today's lesson/tip.
Today's photo tip: It's all about Light
It’s About Light
A Guest post by Lin Junjiefrom Phocus Academy.
 When I first started out in photography many years ago, I didn’t quite appreciate how important light is to photography.
In fact the young and ambitious me often fought against light.
I refused to be restricted by something as fickle as the weather and light. After all, a good photographer should be able to make anything look good—whether it’s noon, sunrise or dusk, right?
The result of my foolhardiness was that I often end up with photos with highlights that are too bright and shadows that are too dark for my camera to handle because I shot them at 12 noon. Or worse—I end up making my human subjects look like racoons because of the high overhead noon light.
Due to the poor lighting I shot the photos under, I wasn’t comfortable showing others the photos that I’ve just taken on my camera because they didn’t look good without extensive post-processing.
 Truth as I learnt is that even the most mundane things on a simple handphone camera can look good in great light, and they can look really good right away without needing any or much post-processing at all.
As a photographer who understands how light can make or break a photo, I now only choose to photograph my day shots at two timings of the day known as the magic hours (or golden hours). In practical terms, they’re basically an hour or two after sunrise, and an hour or two before sunset. The exact timing will depend on where you are and which part of the year you are in.
Here in Singapore where we’re situated close to the equator, and the magic hours are almost always from 7-8.30am and 5-6.30pm. At these hours, light is most interesting because of three reasons:
 To illustrate, I was photographing the temple ruins at Ayutthaya in Thailand sometime late last year. Although I had chosen to shoot in the evening magic hours, the strong cloud cover that day would constantly block and diffuse the warm evening sun.
However I knew I would get a dramatically different—and better—shot once the sun breaks through the clouds and lit the scene in front of me.
Sure enough, patience paid off and I got myself the shot I was looking for. The shots were taken less than 2 minutes apart but made a world of a difference.
Ayutthaya, mundane everyday sights in my neighbourhood can look gorgeous in the right light.

On one occasion on my way back home, I saw how the evening light was casting beautiful shadows of the trees on the apartment blocks nearby. I quickly returned home, grabbed my camera and took two a few shots of the scenes around me.
Within a span of 18 seconds, I had two completely different photos of the same scene.
So while choosing to shoot at the magic hours dramatically increases your chances of getting a good photo, you’re still very much subjected to the weather and cloud cover. But if you choose to fight against light and photograph at the less ideal timings, chances of you getting a good photo are probably terribly slim.
In the world of photography today where people obsess themselves over expensive gear and equipment, light is probably the most understated part of photography.
I often tell my students that learning to appreciate and exploit great light is probably the single, biggest improvement you can do to your photography, even more so than spurlging their paycheque on the expensive lens they’re eyeing after.
Lin Junjie is a professional photographer and photography instructor based in Singapore. He conducts photography workshops and courses in Singapore at Phocus Academy.
When I first started out in photography many years ago, I didn’t quite appreciate how important light is to photography. In fact the young and ambitious me often fought against light.
I refused to be restricted by something as fickle as the weather and light. After all, a good photographer should be able to make anything look good—whether it’s noon, sunrise or dusk, right?
The result of my foolhardiness was that I often end up with photos with highlights that are too bright and shadows that are too dark for my camera to handle because I shot them at 12 noon. Or worse—I end up making my human subjects look like racoons because of the high overhead noon light.
Due to the poor lighting I shot the photos under, I wasn’t comfortable showing others the photos that I’ve just taken on my camera because they didn’t look good without extensive post-processing.
Truth as I learnt is that even the most mundane things on a simple handphone camera can look good in great light, and they can look really good right away without needing any or much post-processing at all.As a photographer who understands how light can make or break a photo, I now only choose to photograph my day shots at two timings of the day known as the magic hours (or golden hours). In practical terms, they’re basically an hour or two after sunrise, and an hour or two before sunset. The exact timing will depend on where you are and which part of the year you are in.
Here in Singapore where we’re situated close to the equator, and the magic hours are almost always from 7-8.30am and 5-6.30pm. At these hours, light is most interesting because of three reasons:
- light is directional and that provides interesting side lighting that can emphasize shape and texture, in addition to casting long, interesting shadows of your subjects,
- light has a more warmer and more attractive colour than midday sun (thus the name ‘golden hour’), and
- light quality is softer and produces highlights and shadows that your camera can deal with more easily than the extremely contrasty light produced by the high midday sun.
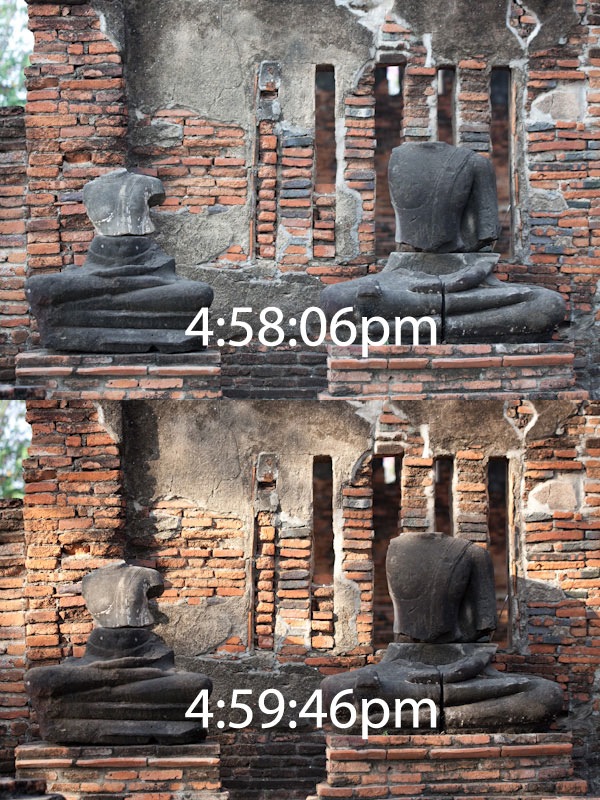 To illustrate, I was photographing the temple ruins at Ayutthaya in Thailand sometime late last year. Although I had chosen to shoot in the evening magic hours, the strong cloud cover that day would constantly block and diffuse the warm evening sun.
However I knew I would get a dramatically different—and better—shot once the sun breaks through the clouds and lit the scene in front of me.
Sure enough, patience paid off and I got myself the shot I was looking for. The shots were taken less than 2 minutes apart but made a world of a difference.
Ayutthaya, mundane everyday sights in my neighbourhood can look gorgeous in the right light.
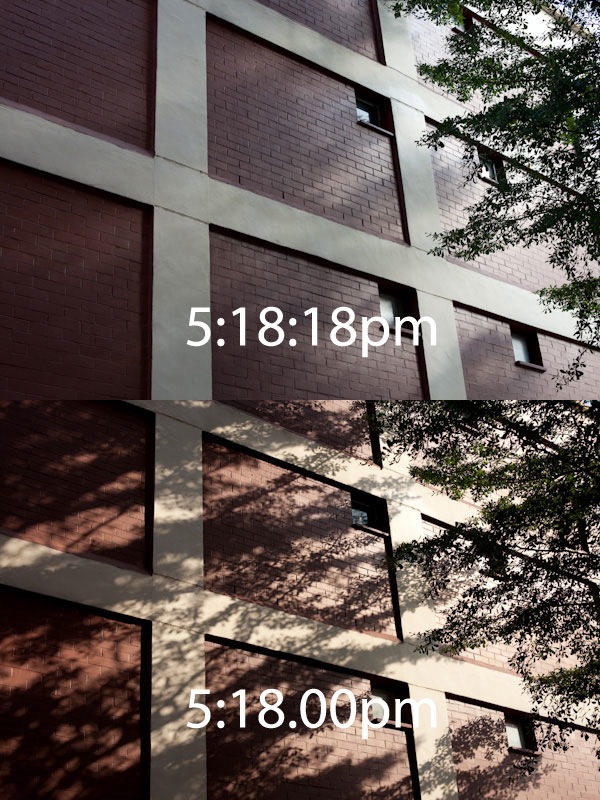
On one occasion on my way back home, I saw how the evening light was casting beautiful shadows of the trees on the apartment blocks nearby. I quickly returned home, grabbed my camera and took two a few shots of the scenes around me.
Within a span of 18 seconds, I had two completely different photos of the same scene.
So while choosing to shoot at the magic hours dramatically increases your chances of getting a good photo, you’re still very much subjected to the weather and cloud cover. But if you choose to fight against light and photograph at the less ideal timings, chances of you getting a good photo are probably terribly slim.
In the world of photography today where people obsess themselves over expensive gear and equipment, light is probably the most understated part of photography.
I often tell my students that learning to appreciate and exploit great light is probably the single, biggest improvement you can do to your photography, even more so than spurlging their paycheque on the expensive lens they’re eyeing after.
Lin Junjie is a professional photographer and photography instructor based in Singapore. He conducts photography workshops and courses in Singapore at Phocus Academy.
Read more: http://digital-photography-school.com/it%e2%80%99s-about-light#ixzz0tREvaqmZ
4.29.2010
April 29 Another week in the life
So it will be another fun filled weekend working my let's feed the children and pay the bills job. I am so eager to finally get out of the rat race of normalcy. I have my eyes on the big prize and though it is not what I really want to do I do have the reassurance that I am in the best job that I have ever had. I like the work and my co workers you can't ask for more than that. So I have been really thinking lately that once the move has been made and the craziness of moving settles down making strong investments is advertising to really get a boost going with my business. It has been put off long enough and I cannot put it off anymore even so-so photographers make good money because they advertise. So my next goal for this year is advertising of some sort and then taking some of what I make from the initial advertising and putting it back in to advertise on a larger scale. I am seriously thinking of getting with another co. to get back into the final Fri. in downtown. I have done it before and had very positive feedback on the quality of my B&W gallery prints. I also would like to get back into it to get my name and my business name out there and more in the public view. So enough of my long winded explanations of my future ventures lets get back to some good old fashion photography tips so with no further ado.
Todays photo tip: Negative Space from www.bestphotolessons.com
One way of making sure your composition is strong is to pay attention to the positive and negative spaces.
The primary subject of your photo, a person, building, toy car, whatever, is the "positive space."
Negative space is everything else. Something you see in a lot of photography is things sticking out of heads, wires across the scene you didn't see when taking the picture, and so on. This is just from paying so much attention to the subject that photographers forget what is in the background or surrounding the subject.
Exercise: take pictures of three different subjects outside. Doesn't matter what they are, a person, a car, a building. While taking the picture, don't worry about the subject, just pay attention to what is around and behind the subject.
Use the background to compose the shot - for this exercise, the actual subject is not important. If the background is not working for you, move around until it is - zoom in or zoom out to change perspective, get low, or go higher. Whatever makes the background a pleasing photo.
Have a Great Weekend will return to blog again next week.
Todays photo tip: Negative Space from www.bestphotolessons.com
One way of making sure your composition is strong is to pay attention to the positive and negative spaces.
The primary subject of your photo, a person, building, toy car, whatever, is the "positive space."
Negative space is everything else. Something you see in a lot of photography is things sticking out of heads, wires across the scene you didn't see when taking the picture, and so on. This is just from paying so much attention to the subject that photographers forget what is in the background or surrounding the subject.
Exercise: take pictures of three different subjects outside. Doesn't matter what they are, a person, a car, a building. While taking the picture, don't worry about the subject, just pay attention to what is around and behind the subject.
Use the background to compose the shot - for this exercise, the actual subject is not important. If the background is not working for you, move around until it is - zoom in or zoom out to change perspective, get low, or go higher. Whatever makes the background a pleasing photo.
Have a Great Weekend will return to blog again next week.
4.16.2010
April 16 A wonderful week


So the senior sessions have been shot and the taxes have been paid what else could be better. Oh I know some more great sessions!!!!!!!! This week was wonderful I got just a taste of what it will be like when I get to doing what I love FT. I have to admit I am addicted the deadlines the artistic opps. I could go on and on but no one wants to read my daydreams so I will leave this entry short and sweet. I hope you enjoy the photos today as I am exceptionally proud of them I believe these 2 are my absolute best to date. I can hardly believe I took them what a thrill to be able to create such beauty.
Subscribe to:
Posts (Atom)


